Order Blocks, Properly Defined
Month 4's four-part definition — Definition / Validation / Entry / Defining Risk — treated as four separate skills, plus the mean threshold.
“Most of what I've been calling an order block never validated. That's why they 'stopped working' — they were never blocks.”
Four skills wearing one name
Here is the definition. Read it once now, and then read it again after the breakdown, because it is not one idea — it is four, and they get taught as one everywhere else.
Definition - The Lowest Candle or Price Bar with a Down Close that has the most range between Open to Close and is near a “Support” level. Validation: When the High of the Lowest Down Close Candle or Price Bar is traded through by a later formed Candle or Price Bar. Entry Techniques: When Price trades Higher away from the Bullish Orderblock and then Returns to the Bullish Orderblock Candle or Price Bar High – This is Bullish. Defining Risk: The Low of the Bullish Orderblock is the location of a relatively safe Stop Loss placement. Just below the 50% of the Orderblock total range is also considered to be a good location to raise the Stop Loss after Price runs away from the Bullish Orderblock to reduce Risk when applicable.
| Part | The question it answers | Where it usually goes wrong |
|---|---|---|
| Definition | Which candle is a candidate? | Marking any down candle before a rally, instead of the lowest, widest-bodied one near support |
| Validation | Is it an order block at all yet? | Skipped entirely. This is the big one |
| Entry | Where exactly do you get filled? | Entering on the approach rather than the return to the high |
| Defining risk | Where is the stop, and when may it move? | Stop placed by pip count instead of at the low; moved too early or in the wrong direction |
The claim this module makes, and it is a strong one: most of what you have marked as an order block over six years never validated. They were not blocks that stopped working. They were never blocks.
Part 1 · Definition — which candle
Three conditions, all of which must hold:
- The lowest candle — not just any down candle in the area. The lowest one.
- With a down close — open above close. Colour matters, and it is the easiest condition to get wrong when you are marking quickly.
- With the most range between open and close — the biggest body in the area, not the biggest total range. Wicks do not count toward this.
- Near a “support” level — his quotation marks. It needs to be somewhere that already mattered.
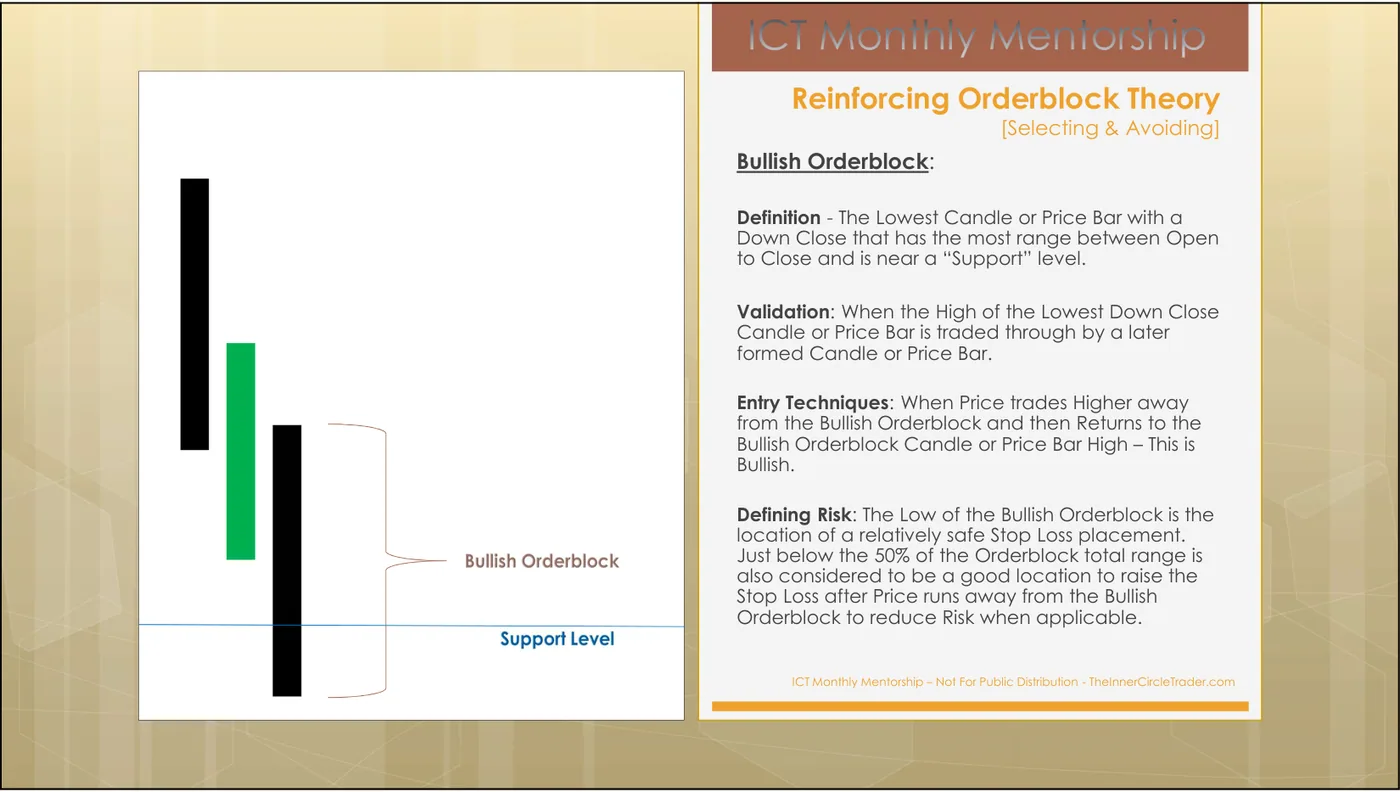
That is a much narrower filter than “the last down candle before the move up.” On a typical daily chart it will disqualify most of what you would have marked.
ICT's definition is on screen with his schematic. Before revealing: point at the candle you would mark as the bullish order block candidate, and say out loud which three conditions it satisfies. Reveal shows the next slide in his sequence.
Part 2 · Validation — the condition nobody applies
When the High of the Lowest Down Close Candle or Price Bar is traded through by a later formed Candle or Price Bar.
A candidate is not an order block until a later candle trades through its high. Until then it is a down candle you have your eye on.
This is a binary, checkable, after-the-fact event, and it is the single most valuable sentence in Tier 2. It means:
- You cannot mark an order block in advance of validation. You can mark a candidate.
- An order block whose high has never been traded through has no status. Drawing a box there and waiting is drawing a box on a candle.
- The validation event is also the expansion from M1 — price leaving the level quickly. The frame and the definition are describing the same moment.
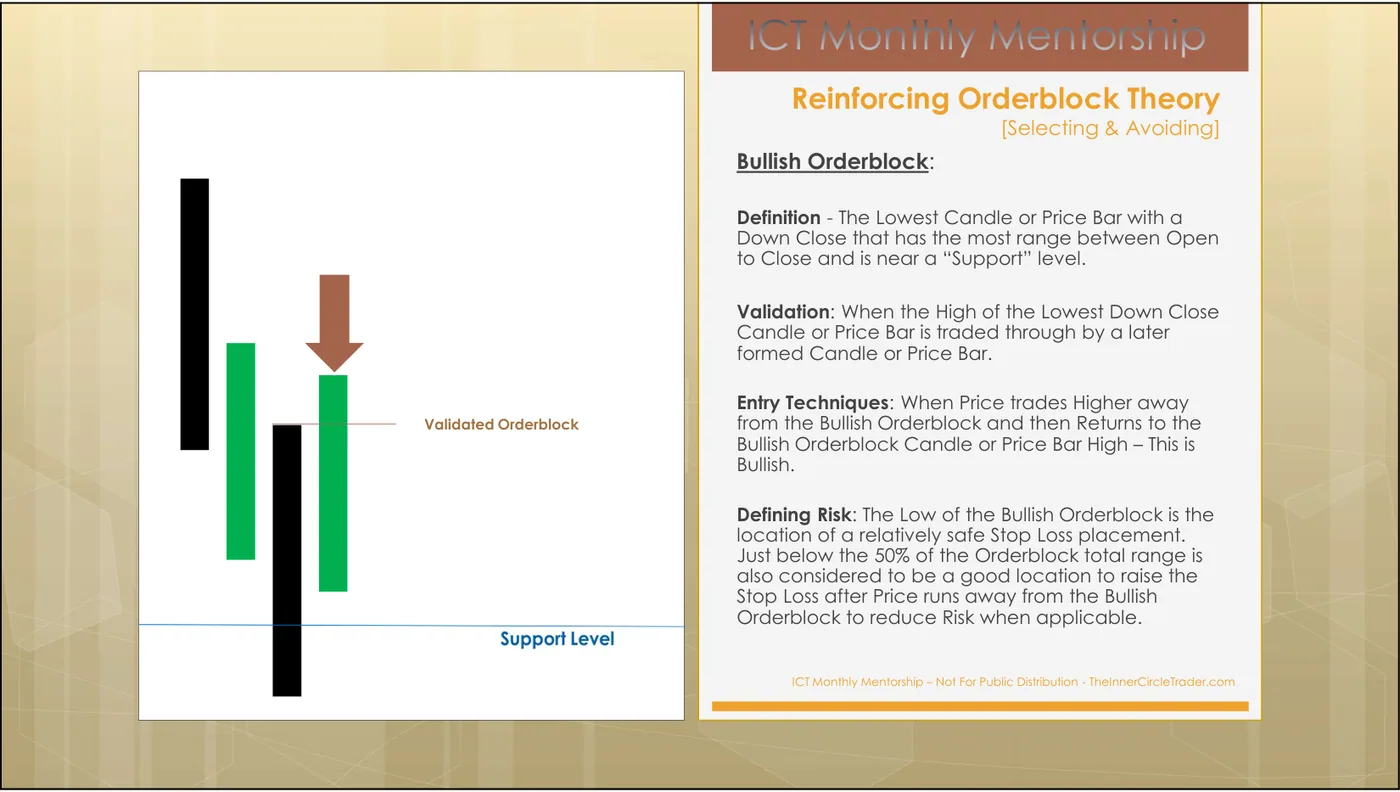
The order block is now validated. Before revealing: what is the correct action at this exact moment? Be specific about whether you are entering, and if not, what you are waiting for.
You find the lowest down-close candle with the biggest body, sitting right on a prior support level. Price has drifted sideways since; nothing has traded through its high. What do you have?
Part 3 · Entry — the return, not the approach
When Price trades Higher away from the Bullish Orderblock and then Returns to the Bullish Orderblock Candle or Price Bar High – This is Bullish.
Two clauses, and the order is mandatory: trades higher away, then returns. The entry level is the high of the order-block candle — the top of the body-defined block, the first price you touch on the way back.
This is why the sequence in ICT’s own slides has a waiting step in it. There is a period after validation where the correct action is to have a resting order and do nothing.
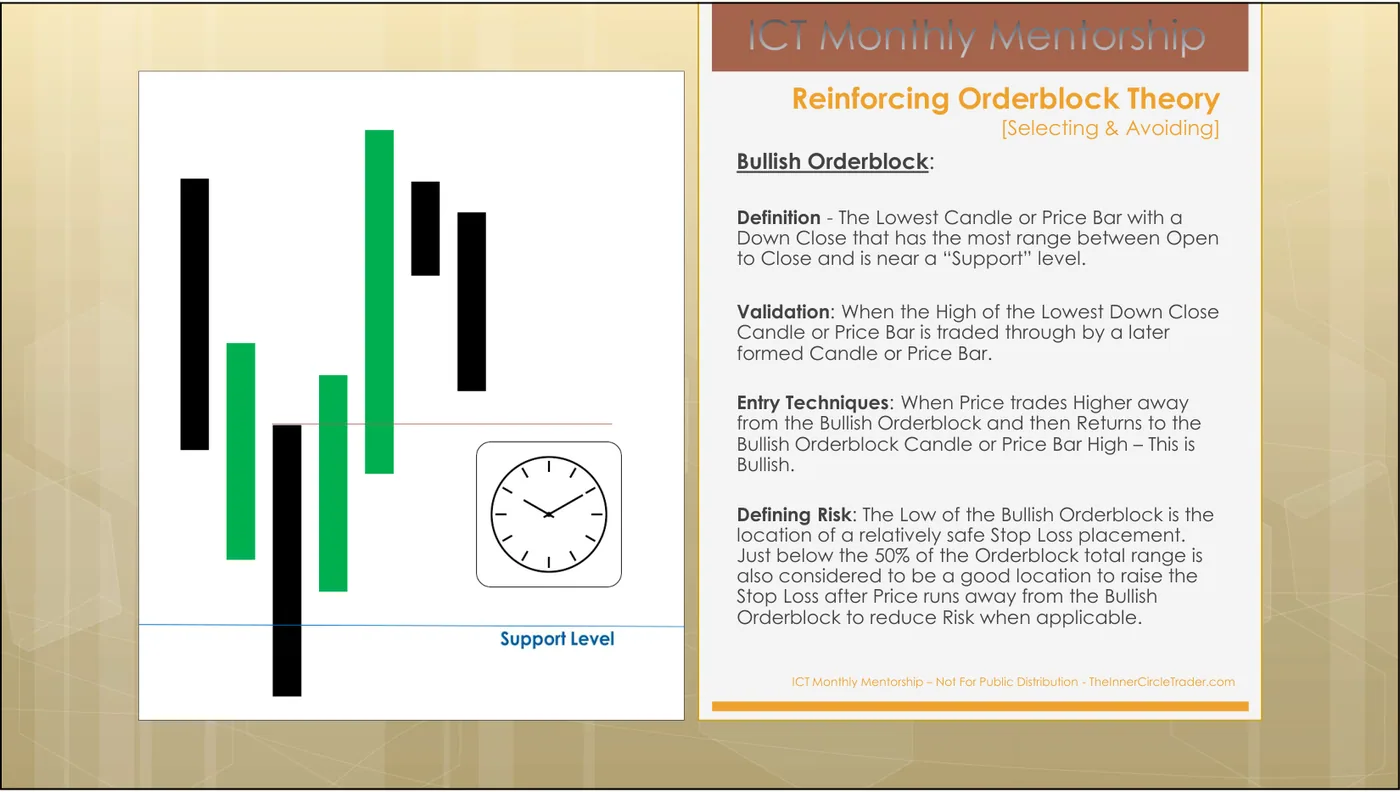
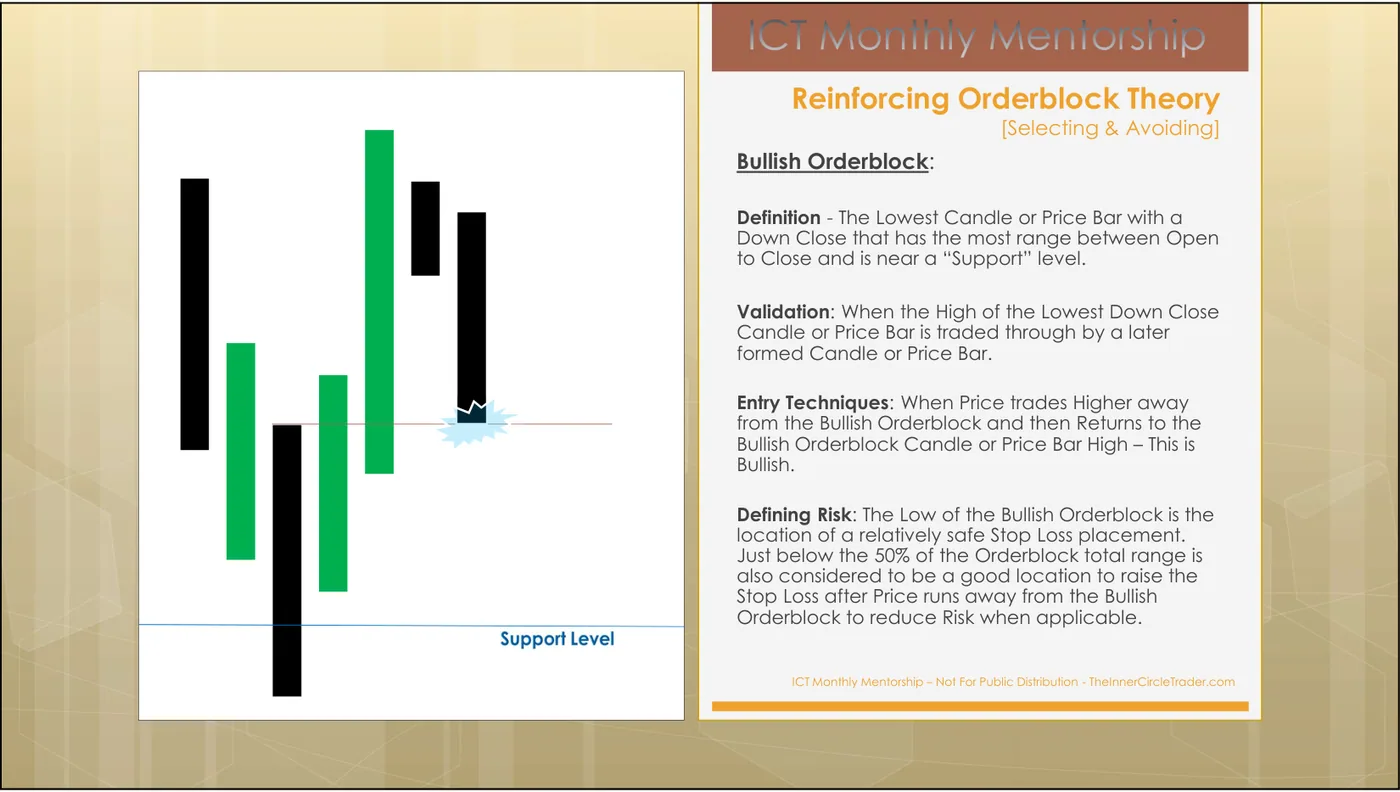
You are waiting with a resting order. Before revealing: at exactly which price does the trade begin, and where does your stop sit at the moment of fill?
The entry technique says price must trade 'Higher away from the Bullish Orderblock and then Return'. Why does the order of those two clauses matter?
Part 4 · Defining risk, and the mean threshold
The Low of the Bullish Orderblock is the location of a relatively safe Stop Loss placement. Just below the 50% of the Orderblock total range is also considered to be a good location to raise the Stop Loss after Price runs away from the Bullish Orderblock to reduce Risk when applicable.
The stop is at the low of the order block. Not 20 pips below your entry — at a structural level, which is what makes the risk defined by the chart rather than by your account size.
The second sentence introduces the mean threshold: the 50% of the order block’s total range.
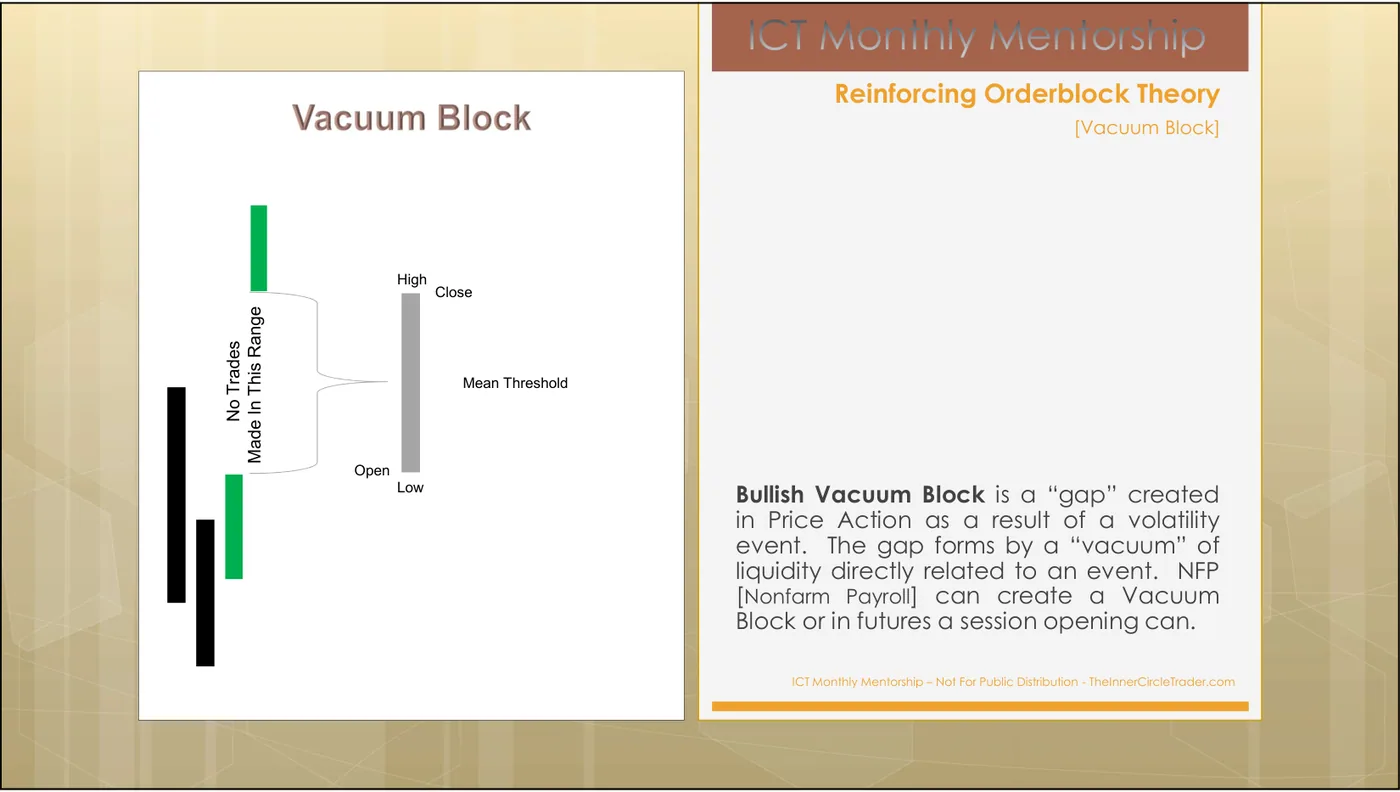
Read the conditions on that sentence carefully, because they are what stop it becoming a bad habit:
- “after Price runs away” — not immediately on entry. The move has to have gone somewhere first.
- “to reduce Risk” — the stop moves toward the entry, never away from it. M13 makes never-move-a-stop-away an absolute rule; this is the one sanctioned direction.
- “when applicable” — his own hedge. It is an option, not a step.
You are long from an order block high. Price has moved most of the way to your target. What does the definition permit you to do with your stop?
The whole sequence, as ICT teaches it
Month 4 builds one schematic across seven consecutive slides. It is the best built-in drill sequence in your library, and the drills above walk it in order. Here are the last two steps, which are about what the trade is for.
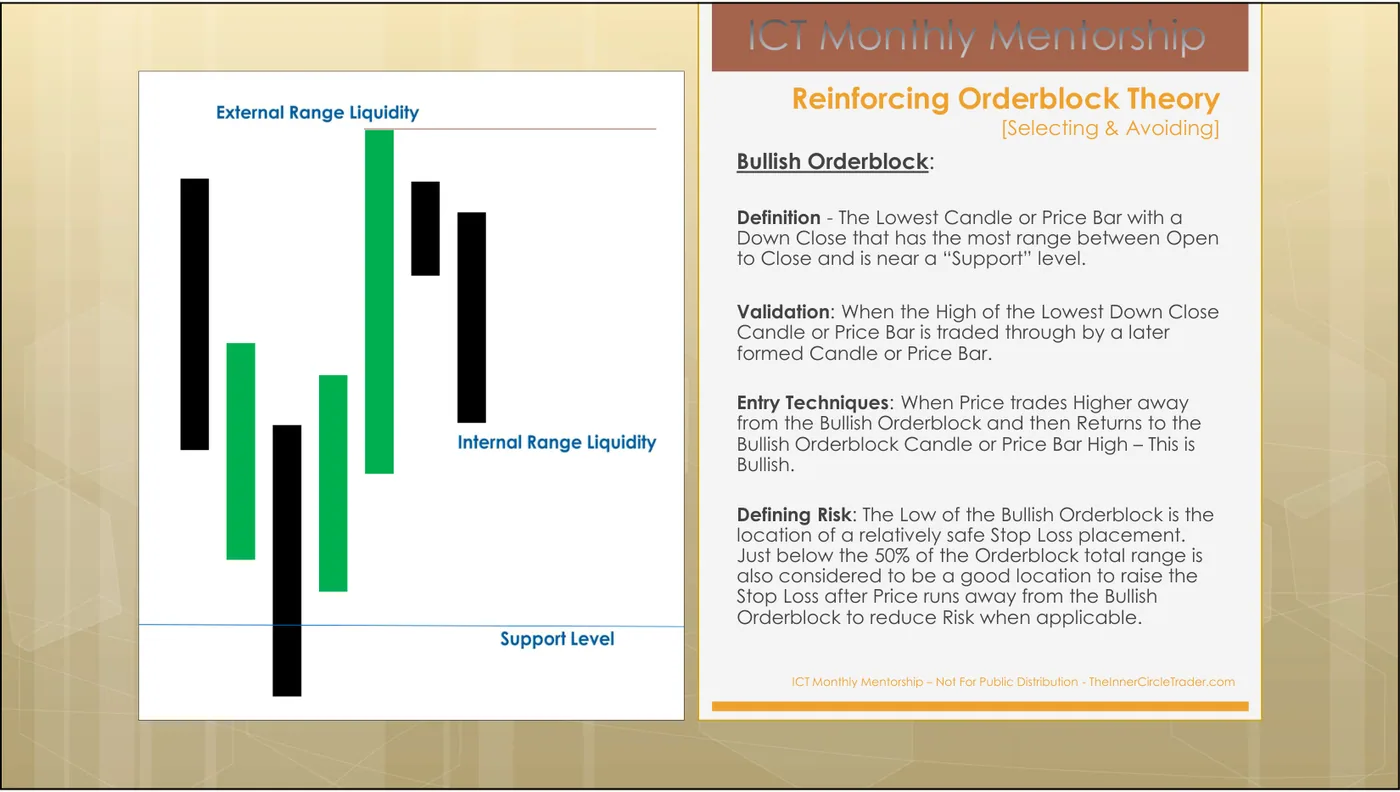
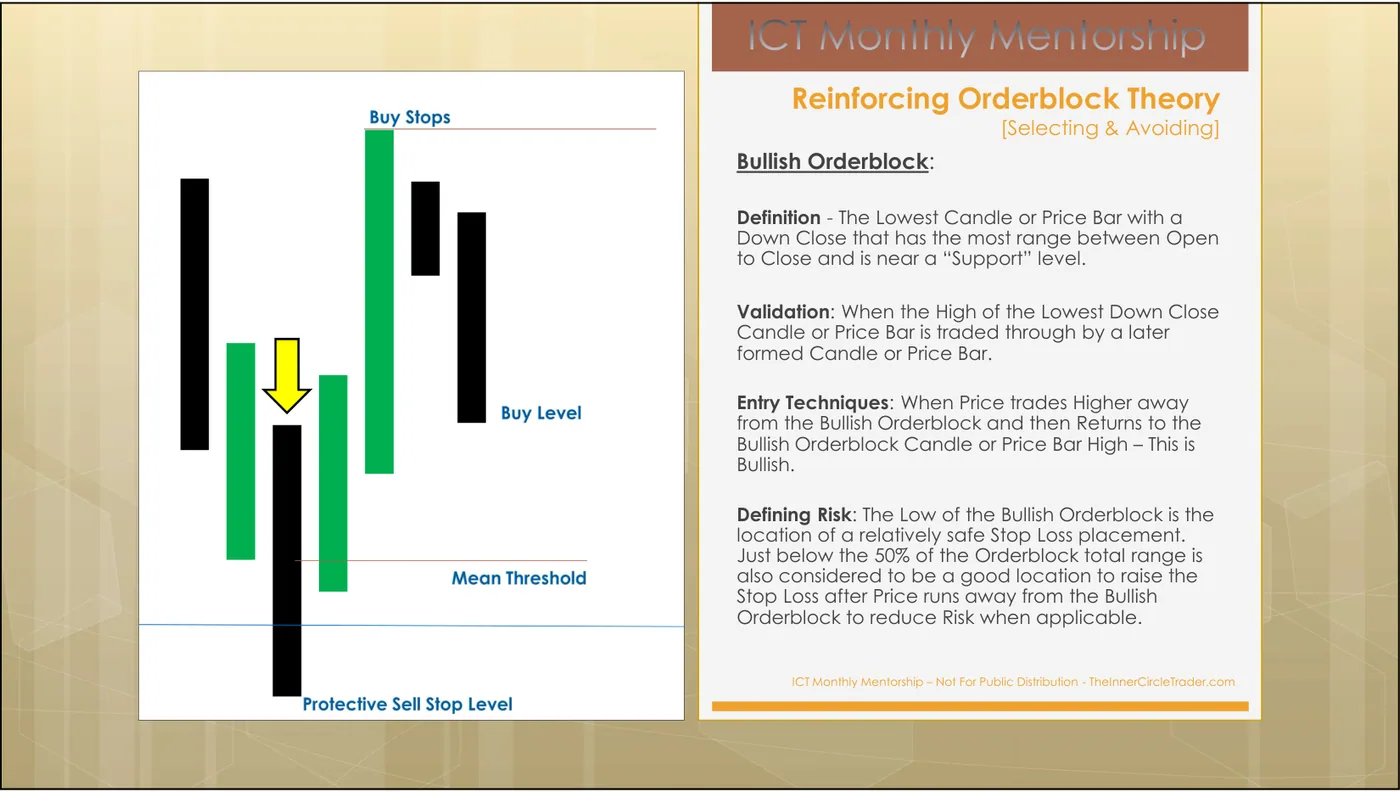
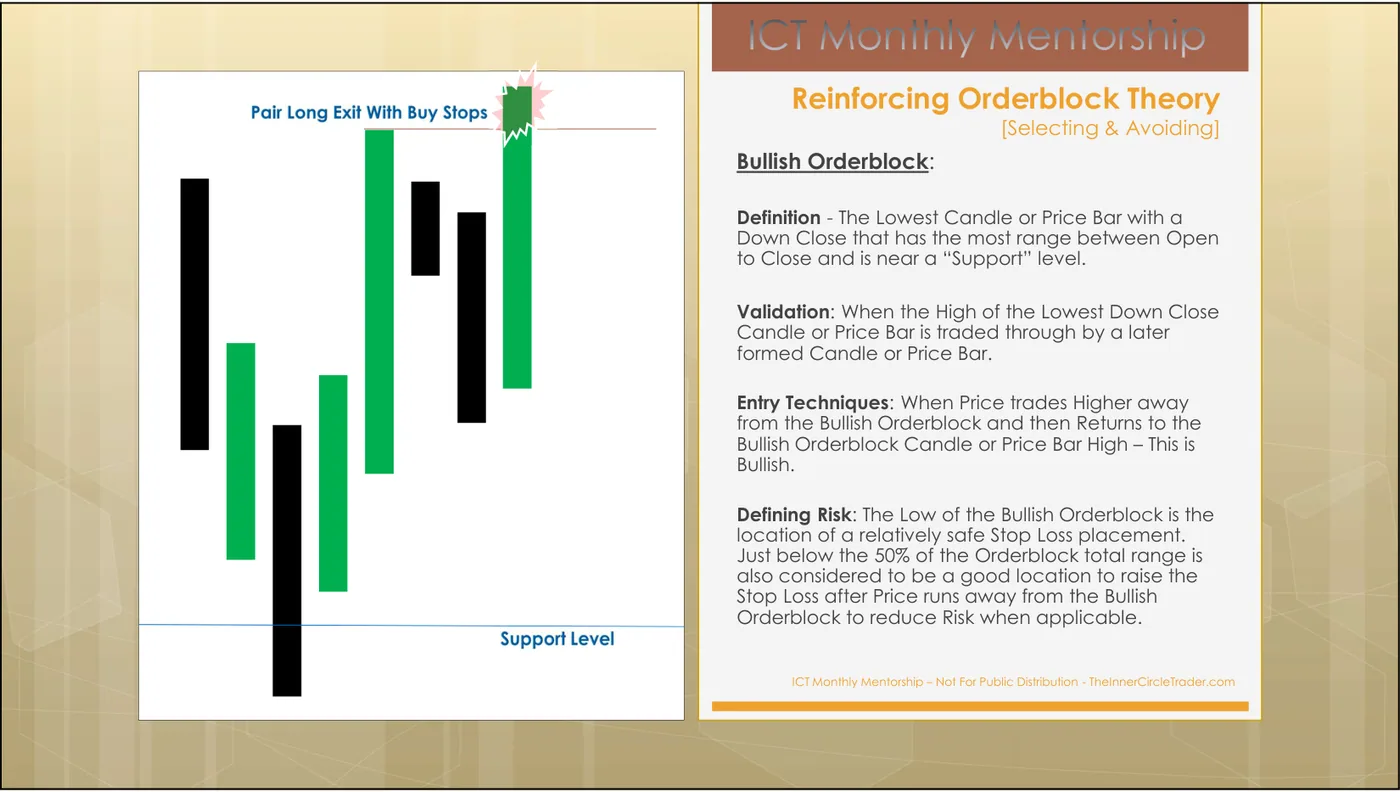
Look at what that last slide is saying. You entered at internal range liquidity and you are exiting into external range liquidity. That is the shape of every trade in this course, and it is the structural reason the method can support a 3:1 minimum: entry near invalidation, target far from it.
The trade is on. Before revealing: using M2's vocabulary, classify the order block you entered at, and name what you are targeting. Reveal shows how ICT labels the same picture.
Before revealing the final two slides of the sequence: write down all four levels of this trade — entry, stop, the level you may later raise the stop to, and the target — and say what each one is anchored to.
The bearish order block
- Definition — the highest candle with an up close that has the most range between open and close and is near a “resistance” level.
- Validation — when the low of that highest up-close candle is traded through by a later formed candle.
- Entry — when price trades lower away from it and then returns to that candle’s low.
- Defining risk — the high of the bearish order block; the mean threshold is the 50% of its range.
Mirror the definition. Which candle is the bearish order block candidate, and what validates it?
Selecting and avoiding
The header on ICT’s own slides is Reinforcing Orderblock Theory [Selecting & Avoiding]. Selection is half the module, and the criteria are already in your hands from Tier 1:
Avoid an order block when —
- it has not validated;
- it sits in the wrong half of the range (a bullish block in premium is a buy where you are not permitted to buy);
- the path from it to your destination is furnished with other untouched arrays (M2’s high-resistance run);
- it is not near anything — “near a support level” is part of the definition, not decoration;
- it has already been traded back into and price left again. Month 4’s later slides treat a level that failed and reversed polarity as a different object, which is the breaker block, and that is M7.
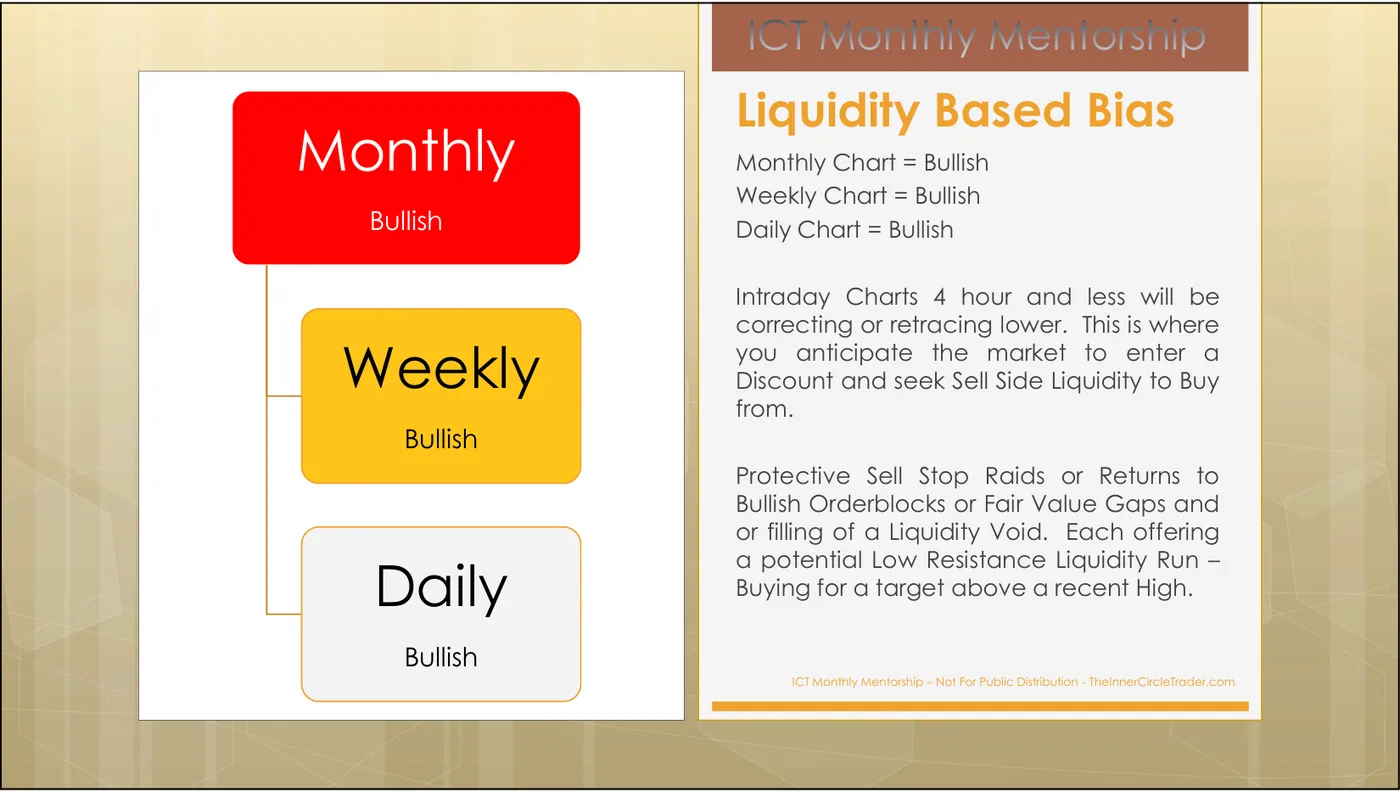
You find a properly validated bullish order block. Price is in the top third of your daily dealing range. Do you take it?
Which of these disqualify an order block from being traded? (Select all that apply.)
The decision rule
- When
- You have identified a candidate order block in the permitted half of the range (DR-4) and on the path to a named destination (DR-2).
- Then
- Check validation first: has a later candle traded through the high (bullish) or low (bearish) of the candidate? If yes, place a limit order at that high/low, stop at the opposite extreme of the block, and target the external liquidity pool you named. Only consider raising the stop toward the mean threshold after price has run away from the block.
- Otherwise
- If it has not validated, there is no order block. Do not draw the box, do not set an alert, and do not enter on the approach. A candidate is not a level.
Done with M5?
Mark it complete only if you could teach the decision rule to someone else without scrolling back up. Completion is stored in this browser.